Wikipedia

Hasil penelusuran

Jumat, 12 Juli 2013

alien

In this tutorial is written how to create a very cool looking alien using Adobe Photoshop Grab a picture of someone and get ready to alienize it!
Alienize a person

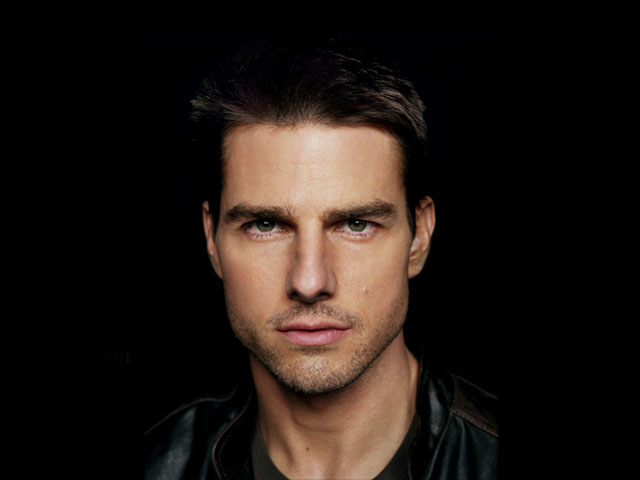
  1. Go to File > New (Ctrl+N) to create a new file. Make sure that you have your background settings to Transparent. Now search for a portrait on your PC to use and add it to your newly created file. For this tutorial I used a picture of Tom Cruise to alienize (Source file Tom Cruise). Ofcourse you can use a picture of your friend, a family member or even yourself.
    Alienize view 1
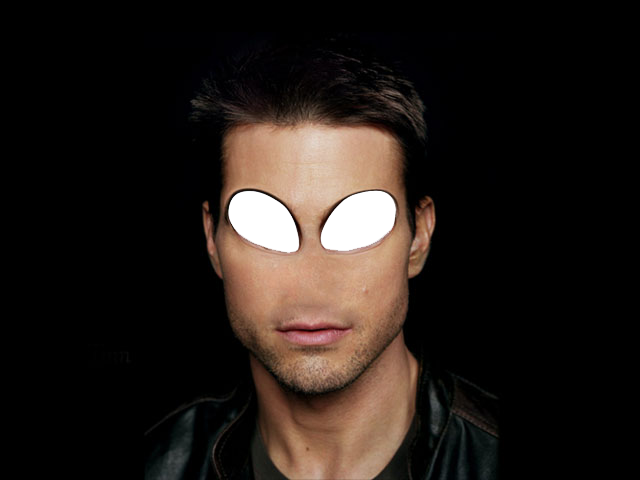
  2. Grab the Eraser Tool (E) and erase the eyes. Now use the Clone Stamp Tool (S) to clone parts of the cheeks over the nose. It'll look like the nose is erased. Use the Healing Stamp Tool to fix any not natural looking parts on the place where the nose first was.
    Alienize view 2
  3. Go to Filter > Liquify Tool (Shift+Ctrl+X) and a new window will show. Use the Forward Warp Tool (W) in this window to strech out the empty place where the eyes first were. I used a brush with a size of approxamitely 30 pixels. Strech it untill it has the shape of an alien eye. Press OK to accept the changes.
    Alienize view 3
  4. I used some alien eyes that I created before (Source file Alien eye) and pasted them in the layer behind the face. Scale the eye using Transform (Ctrl+T) untill it's at a right size. Use the Burn Tool (O) to make the areas around the eyes a little bit darked so it will look more realistic.
    Alienize view 4
  5. Open up the liquify tool by going to Filter > Liquify Tool (Shift+Ctrl+X). Again, use the Forward Warp Tool (W) and strech out the ears. This time I used a brush with a size of 90. Press OK to save the changes and if you want, use the Burn Tool (O) to darken parts of the ears.
    Alienize view 5
  6. Get ready to change some colours using Color Balance (Ctrl+B). Play around with the Color Balance and Tone Balance untill you think you have something alien-like. I used these settings:
    1. Shadows: 0,20,0
    2. Midtones: 0,20,0
    3. Highlights: 0,40,0

    Alienize view 6
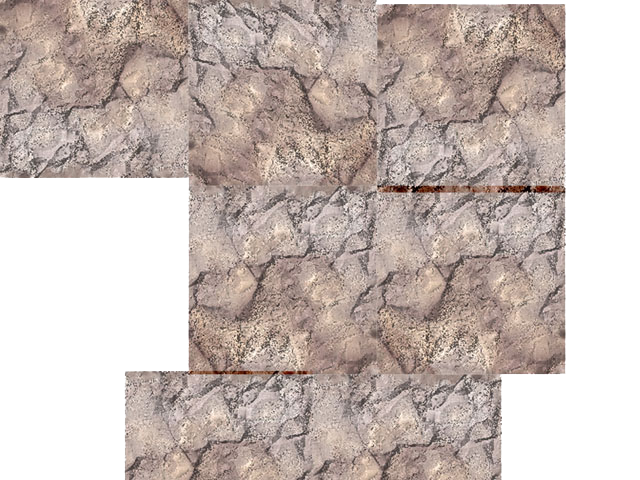
  7. Grunge your face. You can use several options for this, for example you could use a grunge brass Here I used a pattern that I had on my PC (Source file Grunge Pattern). On a new layer, cover the face with the whole grunge pattern using Transform (Ctrl+T) or copy-pasting the pattern next to eachother (See left image below). Set the Blending Mode of the grunge layer to Color Burn and the Opacity around 25%.
    Alienize view 6.5 Alienize view 7
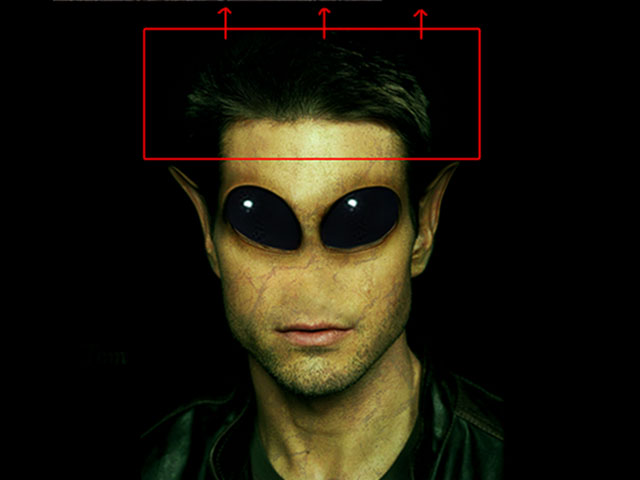
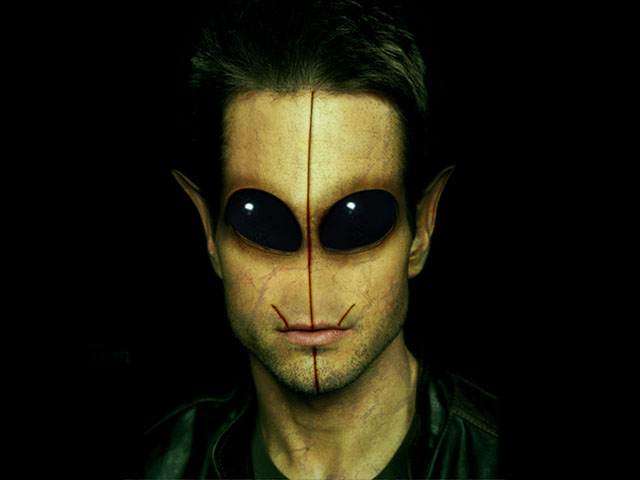
  8. Use the Rectangular Marquee Tool (M) and select the forehead of the face (See left image below). Duplicate layer part (Ctrl+J) and grab the Free Transform Tool (Ctrl+T). Strech the forehead by selecting the middle square and drag it upward. Merge layers (Ctrl+E) (See middle image below).
    Draw facial lines on a new layer using the Brush Tool (B). These lines can be used for detail. Select the lines on the layer and go to Blending Options. In this new window, go to Bevel and Emboss. Use the standard settings but change: Style: Pillow Emboss. I used these values:
    1. Depth: 51%
    2. Size: 1px
    3. Soften: 1px
    When satisfied, press OK to save the settings. Grab your Burn Tool (O) and burn the lines so that it'll look more realistic (See right image below).
    Alienize view 7.5 Alienize view 7.6 Alienize view 8
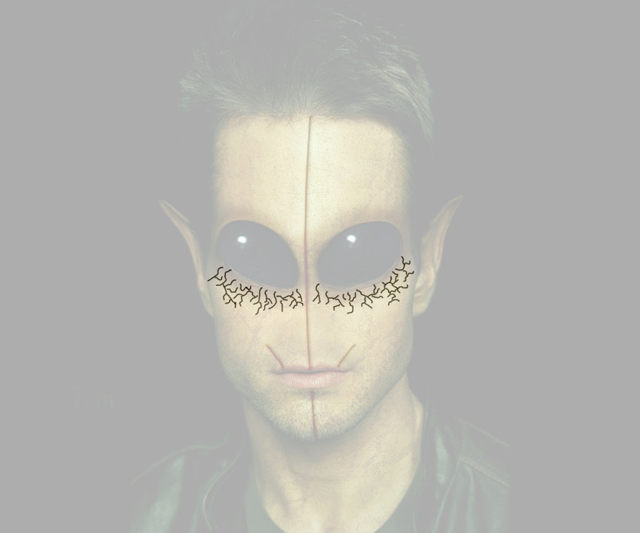
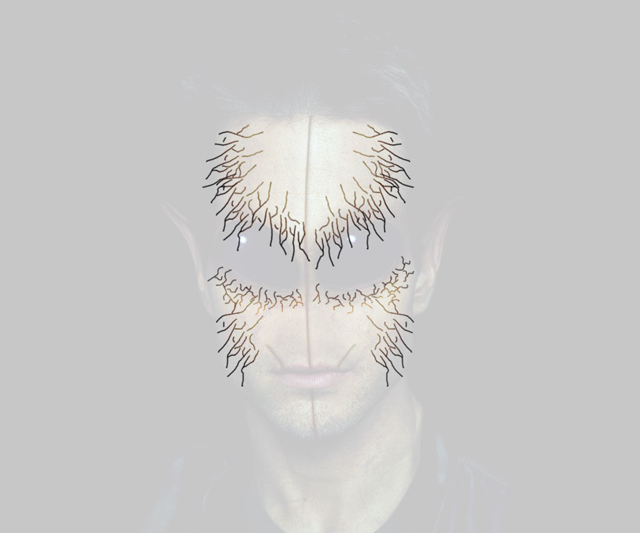
  9. Create a new layer (Ctrl+Shift+N). Draw some veins around the eyes using the Brush Tools (B). I used a brush size of 2 pixels (See left image below). Select the content of the veins layer by Ctrl+Click on the image of the layer. Now you should have the veins selected. Select the layer of the face by clicking on it. Now duplicate the selection of the veins (Ctrl+J). You should get a new layer on top of the layer of the face. Delete the layer with the veins that you drew. Now go back to the layer with the outer lines of the veins. Give them color by opening the Color Balance (Ctrl+B). Play around untill you're satisfied with the colors. Give the layer Soft light or Hard Light to give it more effect. Merge all layers back together (Ctrl+E). Open up Color Balance (Ctrl+B) again and play with the full colors of the image (See right image below).
    Alienize view 8.5 Alienize view 9
  10. Repeat the previous step, but now create some veins on the head (See left image below).
    Alienize view 9.5 Alienize view 10
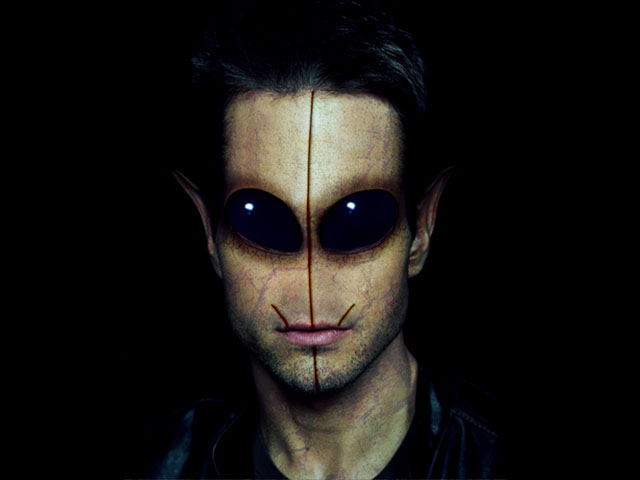
  11. Adjust the levels of the image by opening the Levels panel (Ctrl+L). Change the levels of the image untill you have a nice, realistic looking face.
    Alienize view 11
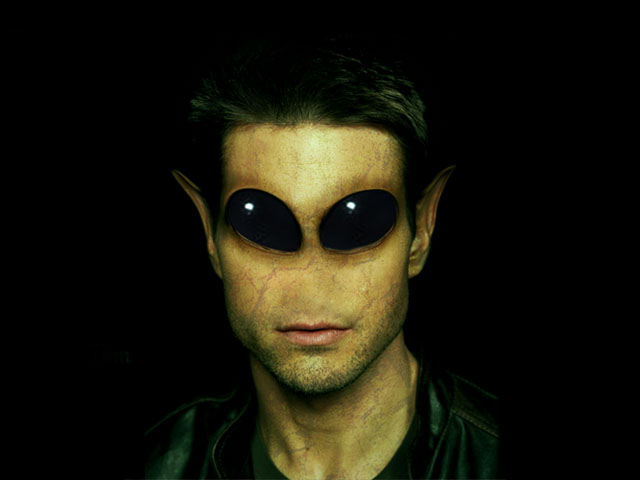
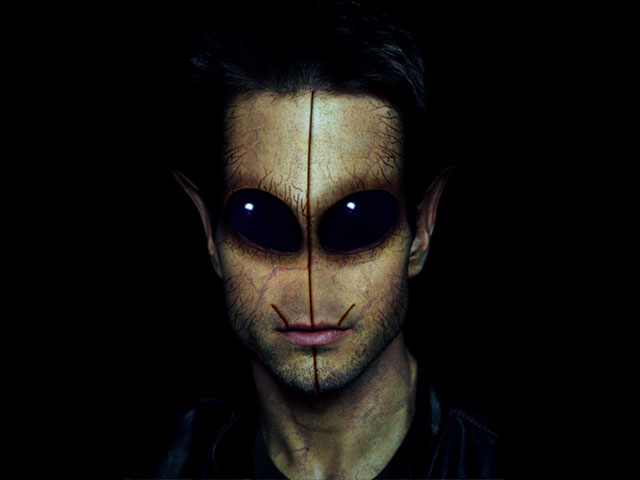
And there you have it, your own created alien. This is my final result Be creative and feel free to post your final result in the comments.
Some people in the comments reported that this tutorial is a copy of one that is posted on worth 100. I checked out the tutorial and I have to admit: It does look-a-like, but it's not a copy. Furthermore, the tutorial on Worth1000 is way much harder and more for professional than this one

Senin, 25 Juni 2012

Tutorial manipulasi foto


Cara menggunakan Adobe Photoshop - dalam artikel manipulasi foto dengan Photoshopbagian satu. Saya telah membahas step awal atau tahap pertama dari tutorial manipulasi foto. saya telah menganggap anda telah mempelajari seleksi / bagaimana Cara menggunakan Adobe Photoshop menghilangkan background foto juga bagaimana cara menyeleksi helai rambut sebagaimana yang telah saya bahas pada bagian pertama dari tutorial ini.

Tutorial Manipulasi Foto

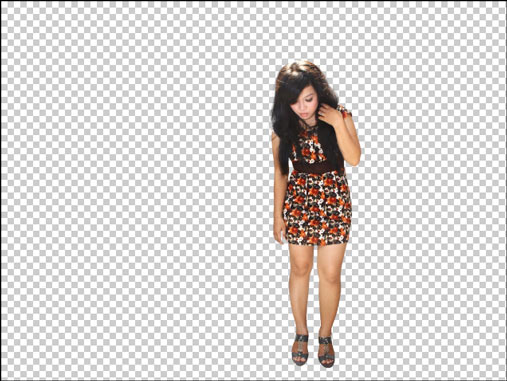
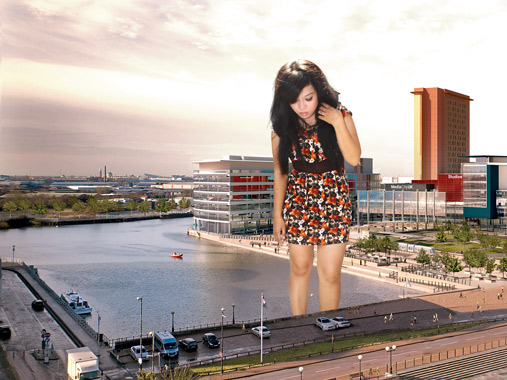
saya anggap hasil akhir dari foto yang telah tercutting dengan sempurna akan tampak seperti gambar dibawah ini :

Kemudian buka juga foto yang akan kita jadikan background dari foto yang telah kita cutting ini, dan pada Adobe Photoshop akan terbuka dua kanvas kerja, yang pertama foto yang telah tercuting dan yang kedua foto yang kita jadikan background
Bila tampilan di Adobe Photoshop tidak tampak kedua foto tersebut maka Cara menggunakan Adobe Photoshop untuk melihat semua kanvas kerja yang sedang aktif adalah dengan menekan tombol F pada keyboard beberapa kali, atau pada Menu Bar pilih Windows - Arangge - Cascade. agar semua kanvas kerja dapat terlihat.
kemudian aktifkan Move Tool pada pallete tool box, Cara menggunakan Adobe Photoshop Move Tool adalah dengan meng-klik dan tahan foto yang akan kita jadikan sebagai background dari project manipulasi foto, kemudian tarik ke dalam foto yang telah tercutting.
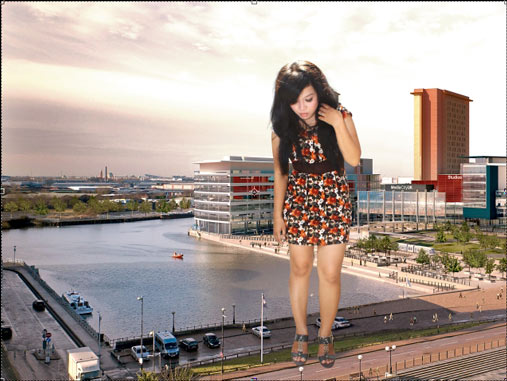
Perhatikan pallete layer, apabila letak layer background foto berada di atas foto yang telah tercutting maka klik dan tahan layer background foto yang berada di atas layerr foto yang tercutting lalu tarik ke bawah layer foto yang telah tercutting. untuk mempelajari pallete layer silahkan membaca mempelajari palette layer  maka hasil nya akan tampak sepertakan i gambar dibawah ini :

tahap berikut nya adalah menyembunyikan bagian kaki objek agar tampak seperti berada di belakang jembatan dari background foto, Cara menggunakan Adobe Photoshop masking adalah dengan menggunakan polygonal lasso tool dan buat lah seleksi di atas layer foto objek atau foto yang telah tercutting seperti yang tampak dibawah ini :

setelah bagian tersebut terseleksi, klik kanan pada area terseleksi lalu pilih select inverse, kemudian untuk menyembunyikan bagian ini gunakan tehnik masking. klik add layer mask pada pallete layer, bila ini dilakukan dengan benar makan hasilnya akan tampak seperti dibawah ini :

Semoga bermanfaat sobat.

manipulasi dalam gelas


Untuk membuat sebuah foto manipulasi yang oke tidak selalu harus menggunakan teknik tinggi dan efek luar biasa. Dengan ide yang lebih kreatif, meski hanya dengan trik biasa kita bisa membuat sebuah foto manipulasi yang cukup menarik, seperti yang akan kita buat kali ini.

Tentang Foto

Beberapa bulan yang lalu saya mengikuti sebuah kegiatan yang diadakan oleh universitas tempat saya belajar. Dalam kegiatan tersebut dilakukan pembagian kelompok-kelompok yang terdiri dari beberapa mahasiswa yang setiap kelompok tidak selalu memiliki jumlah anggota yang sama. Dan saya kebagian kelompok beranggotakan dari tujuh mahasiswa yang berasal dari beberapa fakultas berbeda. Meski kelompok kami jumlahnya cukup sedikit dibanding lainnya, kelompok kami cukup kompak, sehingga berhasil melaksanakan berbagai program yang cukup bagus. Dari hari-hari yang kami lalui, berbagai persoalan yang kami hadapi, kerja keras yang kami lakukan, serta keberhasilan yang kami peroleh semuanya terangkum menjadi sebuah pengalaman yang tak terlupakan, pelajaran yang cukup berharga, serta kebersamaan yang pantas untuk dikenang.
Untuk mengenang kebersamaan tersebut, saya mencari sebuah ide membuat foto bareng yang kreatif dan unik  dan munculah ide foto bareng di dalam gelas. Karena saya pikir tidak mungkin ada studio foto yang menyediakan gelas besar untuk kami berfoto, akhirnya saya pikir photoshop bisa membuat kami berfoto bareng seperti di dalam gelas.
Sebelum kita mulai tutorialnya kita lihat dulu gambar yang akan kita buat.
photoshop foto manipulasi

langkah 1

Sebelum memulai membuat foto manipulasi tersebut, saya mencari gambar gelas yang cukup bagus dengan jumlah sebanyak tujuh untuk menyesuaikan jumlah anggota dalam kelompok saya. Dan saya temukan dalam kumpulan gambar di komputer dengan sedikit perubahan saya dapatkan gambar yang saya inginkan. Berikut gambarnya
photoshop foto manipulasi

Langkah 2

Mencari foto-foto yang gayanya cocok untuk di pasang pada gambar gelas, lalu masing-masing foto saya crop dengan trik seleksi favorit saya. Beri nama layer yang berisikan foto-foto orang dengan nama member. Dengan mengatur posisi masing-masing layer didapat gambar seperti berikut
photoshop foto manipulasi

langkah 3

Duplikat layer background dengan mengaktifkannya dan menekan Ctrl+J. Setelah itu atur posisi layer background copy diatas layer member dengan cara mendrag. akan didapat susunan layer seperti berikut
photoshop foto manipulasi

Langkah 4

Atur opacity layer background copy menjadi 50% dan tambahkan layer mask. Kemudian lakukan masking untuk menghapus background copy yang menutupi bagian tubuh masing-masing orang yang kita harapkan nantinya akan tampak di luar gelas atau dengan kata lain bagian tubuh yang tidak tertutup gelas. lakukan masking seperti pada seleksi dengan quick mask mode
photoshop foto manipulasi
setelah dilakukan masking, akan didapat gambar seperti berikut,
photoshop foto manipulasi

Langkah 5

Kalau kita perhatikan setiap gelas memiliki bayangan di bawahnya. Hal ini menunjukkan gelas ditaruh diatas kaca. Untuk membuat foto manipulasi kita lebih realistais, kita tambahkan bayangan untuk cewek nomor 2 dari kiri.
Untuk menambahkan bayangan pertama duplikat layer member beri nama bayangan, kemudian atur posisinya di atas layer lainnya pada palet layer. Dengan layer bayangan aktif tekan Ctrl+T. Arahkan kursor pada gambar kemudian klik kanan, akan muncul menu pilih Flip Vertical. Setelah itu geser terus ke bawah sampai bagian ujung bawah kaki cewek kedua dari kiri saling berhimpit. Yang terakhir atur opacity layer bayangan menjadi 20%.

Hasil Akhir

Setelah kita lalui semua langkah akan kita dapatkan gambar foto manipulasi sebagai berikut.
photoshop foto manipulasi
Semoga bermanfaat sobat.